00 Microcorruption - Setup and Tutorial
In this series we are going to work through Microcorruption which is an Embedded Security CTF, with the following pretext
Scattered throughout the world in locked warehouses are briefcases filled with Cy Yombinator bearer bonds that could be worth billion’s comma billions of dollars. You will help steal the briefcases.
Cy Yombinator has cleverly protected the warehouses with Lockitall electronic lock devices. Lockitall locks are unlockable with an app. We’ve positioned operatives near each warehouse; each is waiting for you to successfully unlock the warehouse by tricking out the locks.
The Lockitall devices work by accepting Bluetooth connections from the Lockitall LockIT Pro app. We’ve done the hard work for you: we spent $15,000 on a development kit that includes remote controlled locks for you to practice on, and reverse engineered enough of it to build a primitive debugger.
Using the debugger, you’ll be able to single step the lock code, set breakpoints, and examine memory on your own test instance of the lock. You’ll use the debugger to find an input that unlocks the test lock, and then replay it to a real lock.
Should be a milk run. Good luck. We’ll see you on a beach in St. Tropez once you’re done.
Sounds awesome, let’s hack some locks…
Reconnaissance
Let start with some reconnaissance. Looking at the webpage under the (dis)assembler we find a Lockitall Manual, and some datasheets for the MSP430 processor (assuming the Lockitall hardware is using this processor)
Reading the manual
Reading the manual1 give some good information about how the lock works, it is possible to spend a lot of time on this step, and there is a lot of information in the manual and the datasheets. Below some of the general and relevant points for the tutorial is listed
LockIT Pro Spec
- Does use MSP430
- Bluetooth communicate with iPhone app
- No default password
MSP430
- Modified TI MSP430
- 16 bit
- 16 registers
- RISC Architecture
- A RAM based stack
- A simple memory map
Software Interrupts (Lockitall modifications)
- Software interrupts support
- callgate at
0x0010 - The interrupt kind is passed in R2, the status register, on the high byte
- Arguments are passed on the stack
The Door Lock
- Physical lock is on output pin 7
- Interrupt
0x7Funlocks the lock - Automatically re-locks
Enumeration
Alright lets start to look at some code (bytes)
Setup
The online debugger works quite well, however I like to use my regular tools for reverse engineering. By downloading the memory it can be opened in Rizin2 (fork of Radare2), by setting the architecture and define some functions it is possible to get a quite nice setup.
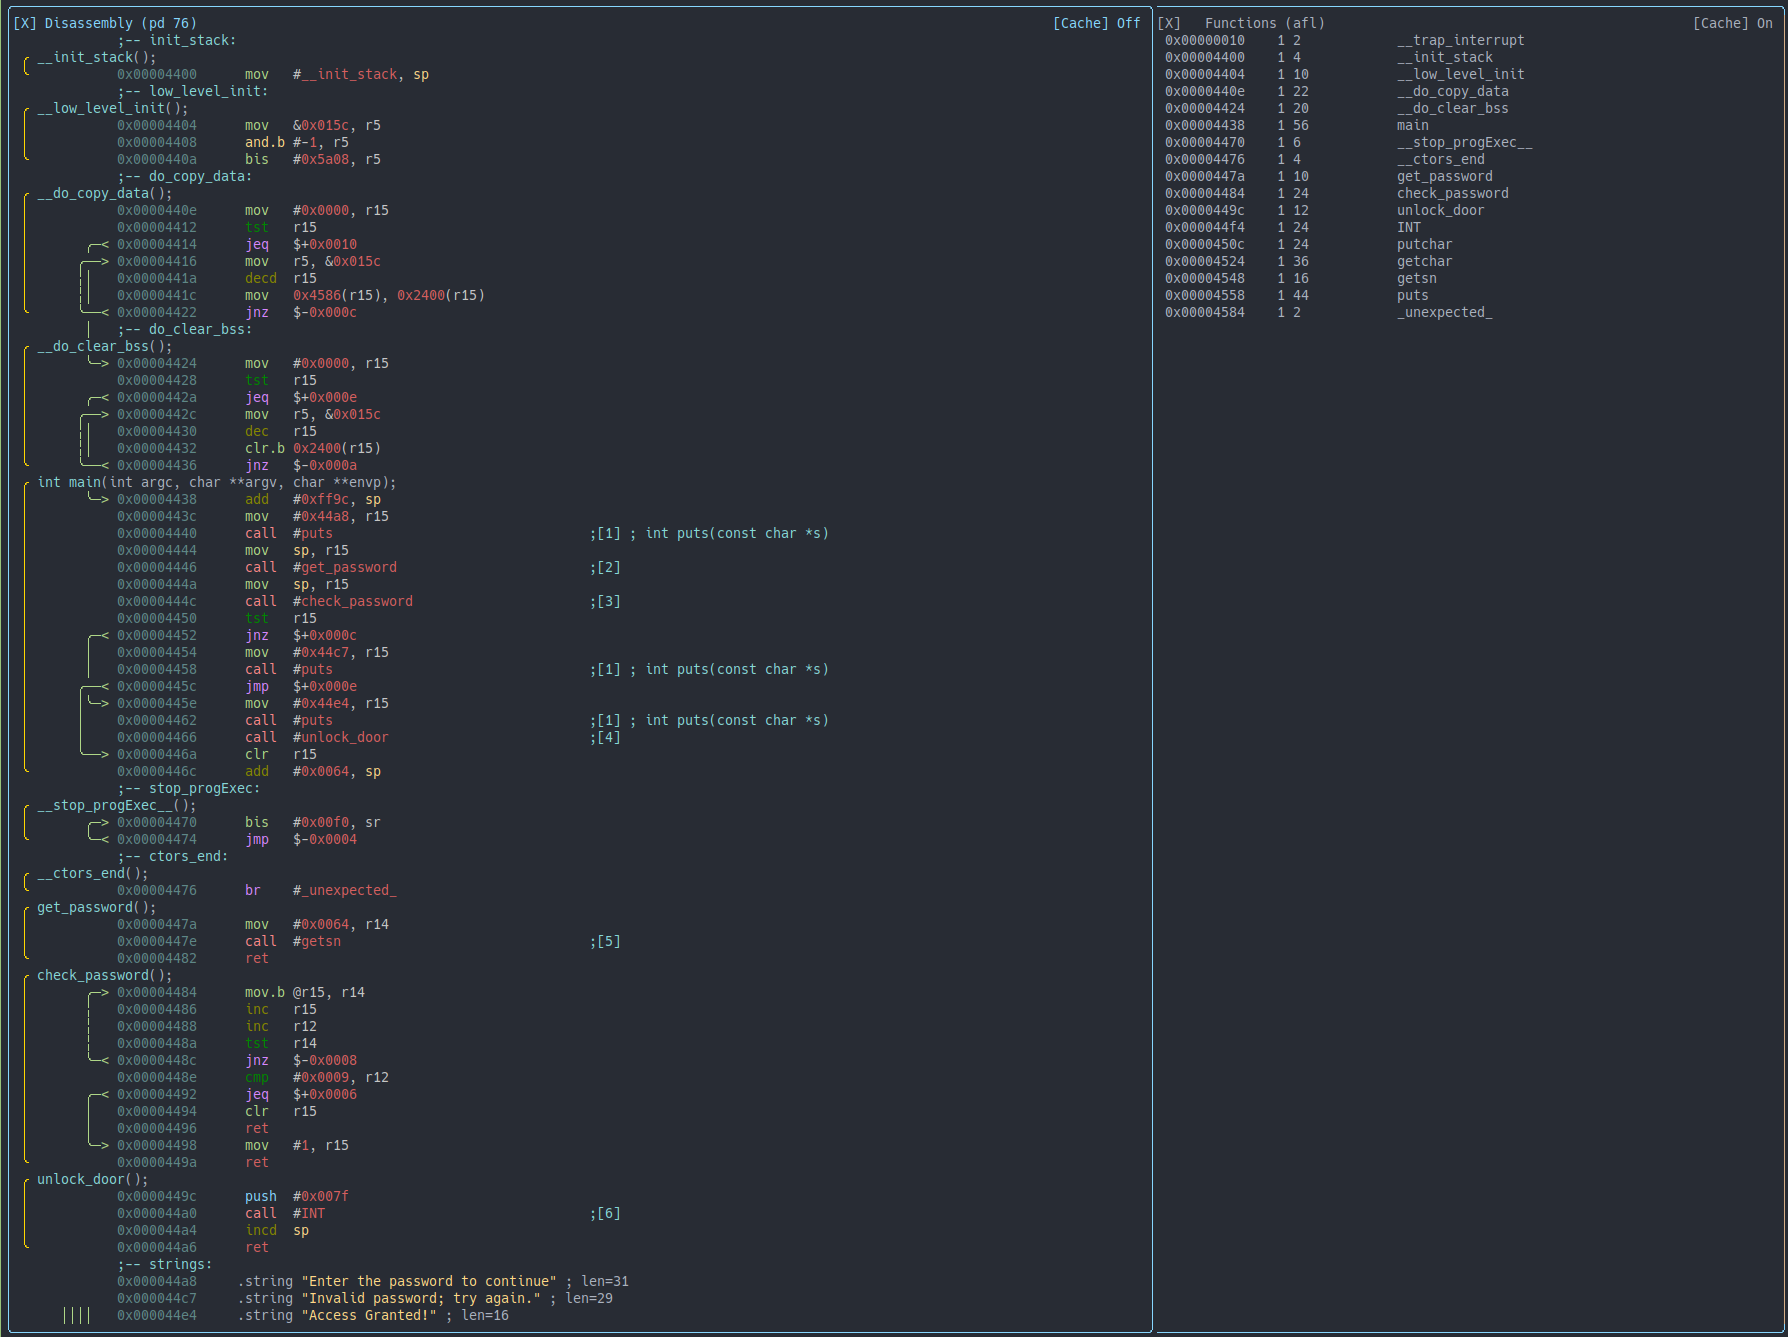
The Rizin setup makes it easier to write comment in the code and reason about it
Prologue
In this first blog post I will go deeper into the code and explain a bit more because this is the first LockIT program that we see, I assume that the following programs will have a lot of the code in common.
Let start at the beginning, we have a memory dump, but where do the processor start executing code?
From the Userguide3 we find the following:
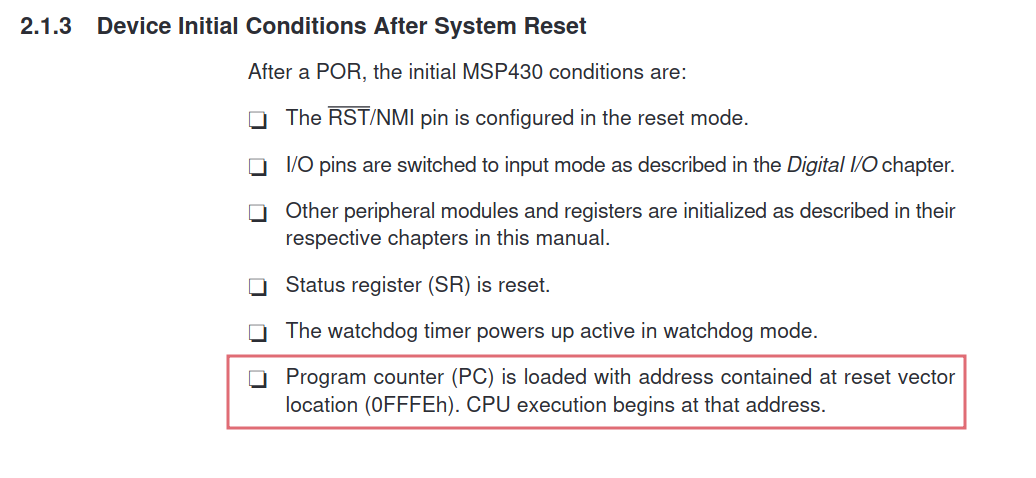
This means that value located at the address 0xFFFE is where the code execution starts. Let’s print the 2 bytes at that address:
[0x]> pxH 2 @ 0xfffe
0xfffe 0x4400 init_stack
We can see that the reset vector contains the value 0x4400 and Rizin also tells us that this value is the address of the init_stack, this can also be seen in the online debugger, the read line is at address 0x4400 and the PC register has already been loaded with this address.
The __init_stack “function” is very simple, it moves the value 0x4400 into the SP register, this apparently initializes the stack.
[0x4400]> pdf
╭ __init_stack();
╰           0x4400      mov   #__init_stack, sp
There is no jump instruction, so we just keep executing next instructions leading us into the __low_level_init “function”. Here we move a value from address 0x015C into the R5 register, the lowest byte of R5 is then ANDed with the value 0xFF which gives 0x00, this is stored back into the lowest byte of R5. Finally, the value 0x5A08 is ORed with R5 and saved back into R5, resulting in R5 = 0x5A08, now low level has been initialized.
[0x4404]> pdf
╭ __low_level_init();
│           0x4404      mov   &0x015c, r5
│           0x4408      and.b #-1, r5
╰           0x440a      bis   #0x5a08, r5
Again there is no jump at the end, so we just keep going. Leading us to __do_copy_data where we start by clearing register R15 by moving zeros into it. Next we test if R15 is zero and store the result in the zero bit of the status register SR. We now have a conditional jump, if the R15 did contain zero we follow the jump to address, here it is expressed as the current address 0x4414 plus 0x0010 resulting in 0x4424. At his address we find __do_clear_bss which can be seen in the comment.
[0x440e]> pdf
╭ __do_copy_data();
│           0x440e      mov   #0x, r15
│           0x4412      tst   r15
│       ╭─< 0x4414      jeq   $+0x0010              ; __do_clear_bss
│      ╭──> 0x4416      mov   r5, &0x015c
│      ╎│   0x441a      decd  r15
│      ╎│   0x441c      mov   0x4586(r15), 0x2400(r15)
╰      ╰──< 0x4422      jnz   $-0x000c
We have now jumped to __do_clear_bss, and we can see that the first three instructions are the same as in __do_copy_data, so again we follow the jump, but this time it is to address 0x4438 where main is located.
[0x4424]> pdf
╭ __do_clear_bss();
│           0x4424      mov   #0x, r15
│           0x4428      tst   r15
│       ╭─< 0x442a      jeq   $+0x000e              ; main
│      ╭──> 0x442c      mov   r5, &0x015c
│      ╎│   0x4430      dec   r15
│      ╎│   0x4432      clr.b 0x2400(r15)
╰      ╰──< 0x4436      jnz   $-0x000a
Main
Finally, we ended up in main, you might be familiar with what a main function is, normally it is the first entry to the code that the developer actually wrote, all the stuff before main was put in by the compiler for setting up hardware specific things before the developer written code can be executed. Let’s take a look at main.
[0x4438]> pdf
╭ int main(int argc, char **argv, char **envp);
│           0x4438      add   #0xff9c, sp
First we add the value 0xFF9C to the stack pointer. In the __init_stack we moved the value 0x4400 into the stack pointer, so let’s calculate what value is here after we run this instruction. 0x4400 + 0xFF9C = 0x1439C, but the stack pointer is only 2 bytes (16 bits) so the value is truncated to 0x439C.
[0x4438]> px 112 @ 0x439c
- offset -   0 1  2 3  4 5  6 7  8 9  A B  C D  E F  0123456789ABCDEF
0x439c      0000 0000 0000 0000 0000 0000 0000 0000  ................
0x43ac      0000 0000 0000 0000 0000 0000 0000 0000  ................
0x43bc      0000 0000 0000 0000 0000 0000 0000 0000  ................
0x43cc      0000 0000 0000 0000 0000 0000 0000 0000  ................
0x43dc      0000 0000 0000 0000 0000 0000 0000 0000  ................
0x43ec      0000 0000 0000 0000 0000 0000 0000 0000  ................
0x43fc      0000 0000 3140 0044 1542 5c01 75f3 35d0  ....1@.D.B\.u.5.
This is 100 bytes before the original 0x4400, so we just made room for 100 bytes on the stack frame for this function. Printing 112 bytes from this address shows that the stack is actually filled with 100 bytes or zeros, and then our __init_stack “function” starts
│           0x443c      mov   #0x44a8, r15
│           0x4440      call  #puts
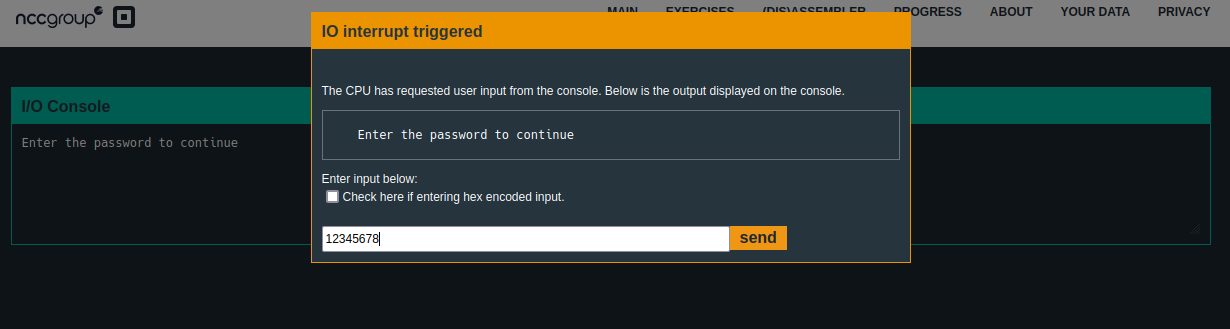
Next in main we move 0x44A8 into R15, and then we call puts. The call instruction pushes the next address in memory to the stack, also known as the return address. From the MSP430 ABI4 document we can read about the calling conventions for the MSP430, it states that arguments are parsed via the registers, with this information the value moved into R15 must be an argument for the puts function. We will get back to this later when we look at the puts function.
│           0x4444      mov   sp, r15
│           0x4446      call  #get_password
After we return from puts, we prepare a new argument, but this time for the get_password function, judging from the name of that function I would suspect that it somehow return a password string. The argument to the function is our stack pointer, it would make sense that get_password will write the password string to the stack for our mainfunction to access it.
│           0x444a      mov   sp, r15
│           0x444c      call  #check_password
After return from the get_password function, we once again see the pattern of preparing an argument in R15 and then calling a function, this time the function is check_password (seem like an interesting function to check out), this function also gets the stack pointer as argument, which make sense since the get_password function probably wrote the password string there, and now we want the check_password function to surprise check the password.
│           0x4450      tst   r15
│       ╭─< 0x4452      jnz   $+0x000c
│       │   0x4454      mov   #0x44c7, r15
│       │   0x4458      call  #puts
│      ╭──< 0x445c      jmp   $+0x000e
│      │╰─> 0x445e      mov   #0x44e4, r15
│      │    0x4462      call  #puts
│      │    0x4466      call  #unlock_door
│      ╰──> 0x446a      clr   r15
╰           0x446c      add   #0x0064, sp
If a function wants to return something, this will also use R15. So check_password returns a value in R15 that we then do a test on to see if the value is zero. And then we have a conditional jump.
If the value returned is zero we do not jump. And we then prepare 0x44C7 for another call to puts, we then jump to a clear of the R15, followed by cleaning up the stack pointer to the value it had when we first arrived at main.
However, as you might have seen, a more interesting route would be if the check_password returned a non-zero value. Then we would jump to another puts call, but with 0x44E4 as argument, followed by a call to a function named unlock_door which smells a bit like what we are trying to achieve here.
Check_password
Let’s focus on what seems most interesting for our goal, the check_password function.
[0x4438]> pdf @ check_password
╭ check_password();
│       ╭─> 0x4484      mov.b @r15, r14
│       ╎   0x4486      inc   r15
│       ╎   0x4488      inc   r12
│       ╎   0x448a      tst   r14
│       ╰─< 0x448c      jnz   $-0x0008
Let’s split the function up in two parts, the first part above, takes a byte from the address in R15 (remember this was the stack pointer where the password presumably was stored) and saves it in R14.
R15 is the increased to point to the next character of the password on the stack.
R12 is increased as well. This was not an argument to the function, so this register probably contained zero going into the function.
Then we test if R14 is zero, if it is not zero we jump to the start of the function, remember that strings are zero terminated, to this part of the function is essential just a loop that count the number of characters in the password string.
│           0x448e      cmp   0x0009, r12
│       ╭─< 0x4492      jeq   $+0x0006
│       │   0x4494      clr   r15
│       │   0x4496      ret
│       ╰─> 0x4498      mov   1, r15
╰           0x449a      ret
The second part of the check_password function will execute when we reach the end of the password string. First R12 is compared to the value 0x09, we then jump if R12 = 0x09. Remember form main that we want check_password to return a non-zero value in R15.
Looking at the code we see that if we follow the jump, we move a one into R15, and then we return, yielding a non-zero value in R15 which is what we want. If we do not follow the jump, R15 is cleared to zero and we return.
So to follow the jump we need R12 to contain the value 0x09 when we get to the last part of check_password. Since R12 is increased before we test for the last characters of the password string, we need the null byte termination to be the 9th byte.
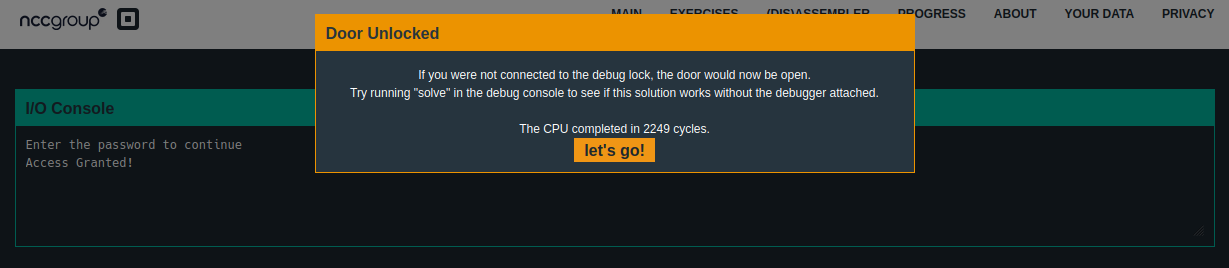
This means that if our password input is any 8 characters it will make check_password return a non-zero value in R15 making main call unlock_door.
Success, the door is unlocked, and we now go access to 3 new locations.